
FORCES
Eggshell Arches
- Safety Rules:
- Parent supervision
- Take care with a knife
- Materials you need are:
- 4 raw eggs
- a small knife
- some books
- sticky tape
- a cup to keep the egg contents
-

Carefully break off the small ends of the 4 eggs, and empty out the insides into a cup (cook with this later if you like). Wind a piece of sticky tape around the centre of the eggs to reinforce the shells. Then cut through the sticky tape to make 4 dome-shaped shells. Place these on a table in a square, and see how many books they can support before collapsing.
Arches or domes are strong because they can exert horizontal as well as vertical forces to support heavy weights.
Teabag Rocket
- Safety Rules:
- Parent supervision
- Take care with fire or heat
- Do it outdoors but where there is no breeze
- Materials you need are:
- a teabag (not the pyramid type)
- matches
Remove the tag and the staple from a teabag (not the pyramid type). Empty out the tealeaves and form a cylinder that can stand by itself on a table. Light the top of the teabag cylinder with a match, and observe.
As the teabag cylinder burns, it becomes lighter. At the point when the force of hot ait lifting upwards becomes greater than the force of gravity (weight) pulling downwards, the teabag lifts off.
Balloon Rocket
- Safety Rules:
- Parent supervision
- Materials you need are:
- a long sausage-shaped balloon
- sticky tape
- a drinking straw
- a long straight length of wire
Stretch the wire across the room (e.g. from one curtain rail to another) and secure one end. Slide the straw onto the second end of the wire and fasten it so that the wire is tight. Blow up the balloon, hold the neck but don't tie it, and sticky tape the whole balloon quickly to the straw. Release the neck of the inflated balloon.
The balloon 'rocket' should slide across the room on the wire. The air being expelled from the balloon (action) forces the balloon to slide in the opposite direction (reaction).
Make a Hovercraft
- Safety Rules:
- Parent supervision
- Take care with electric tools
- Take care with a knife
- Take care with glue (It is poisonous)
- Wear gloves and goggles
- Materials you need are:
- a metal lid (about 10cm in diameter)
- a cork (from a wine bottle)
- a balloon (the round type)
- some strong glue
- an electric drill
- a workbench
- a smooth table top
-
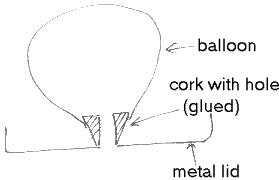
Ask a parent to glue the cork onto the centre of a metal lid for you. When completely dry, ask a parent to drill a wide hole (about 1/4cm) in the centre of a metal lid and the centre of a cork for you as in the diagram. Place it over on a smooth table top. Inflate a balloon and attach it over the cork. Watch your gadget hover.
The air will be expelled out of the balloon and through the holes in the cork and the lid, creating a cushion of air on which your hovercraft will glide.
Make a Paper Helicopter
- Safety Rules:
- Parent supervision
- Take care with scissors
- Materials you need are:
- a sheet of A4 photocopy paper
- a ruler
- a pen
- scissors
- a paperclip
-
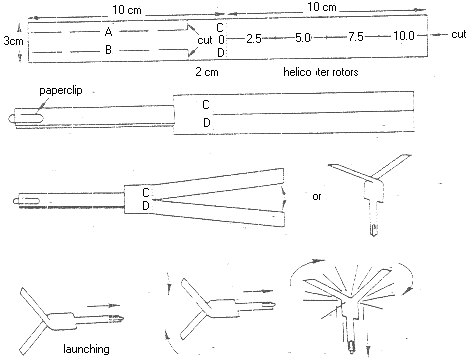
Copy the design of the helicopter as in the diagram onto your paper. Cut along the solid lines. Completely fold along the dotted lines marked A and B. Use the paperclip to hold the folded pieces as shown below.
Partially fold the paper along the dotted lines C and D as shown below.
Hold the paperclip and launch the helicopter horizontally. Watch it rotate.
Make a Hang-Glider
You will need a sheet of A4 photocopy paper and some paperclips.
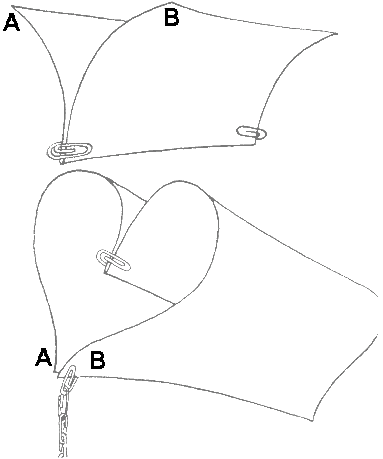
Fold the sheet in half across its narrowest part (its width). Paperclip both thicknesses together near the fold.
Curl the halves of the paper outwards and downwards. Then clip together the corners A and B - which will be at the front of the hang-glider. Form a short chain of paperclips attached to the clip at the front end of your hang-glider (you can vary the number). Test the model by trying to make it glide in a steady way, but not losing height too soon.
Simple Harmonic Motion of a Candle
- Safety Rules:
- Parent supervision
- Take care with fire or heat
- Take care with sharp needles
- Materials you need are:
- a long thin candle (about 15cm long and burnt at both ends)
- matches
- 2 sewing needles
- 2 supports
-
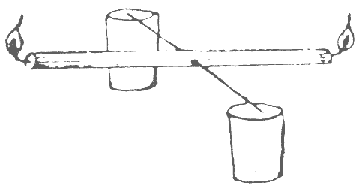
Balance a candle through the centre of gravity with the 2 needles. Support both needles so that the candle can rock freely. Light both candle ends at the same time. After a few minutes, watch it see-saw up and down.
The candle will burn slightly faster at one end than the other and rise up because it is lighter. This will cause the opposite end to be heavier and lower. Then the lower end will burn more and get lighter and rise. The simple harmonic motion will continue.
Floating Candle
- Safety Rules:
- Parent supervision
- Take care with fire or heat
- Take care with sharp tacks
- Materials you need are:
- a candle (about 10cm long and about 5cm wide)
- matches
- a bowl of water
- some thumb tacks
-
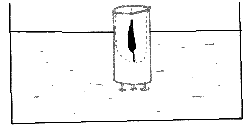
Place the thumb tacks in the base of the candle to weigh it so the candle floats upright in the water. Light the candle while afloat and allow it to burn to the water line. This takes about 20 minutes.
The water has a cooling effect on the wax while the candle flame has a heating effect. The overall result is that a hollow will be made in the floating candle as shown in the diagram.
Dominoes Design
Find a game of Dominoes. Stand them on their smallest ends (widths) closely one after another. Set them up in various branching designs. If you push over the first one, you should be able to collapse them all one after the other.
Ooze
- Materials you need are:
- cornflour
- water
- a container
- a spoon
In the container, mix together to make a firm paste - a handful of cornflour and a spoonful of water. Now poke the ooze slowly and observe what happens. Then poke it quickly and see what happens.
The adhesive forces of attraction between the water molecules and the starch molecules vary with different amounts of applied pressure.
Tension at the Surface
- Materials you need are:
- a clear jar
- a jug of water
- lots of paperclips
- a bar of soap or a squirt of detergent
Place the empty jar on a table. Fill the jar completely to the brim with water from the jug. See how many paperclips that you can slide into the jar one one until the water overflows. Repeat the experiment but this time, put a bar of soap or a squirt of detergent into the jar before filling it with water.
You should be able to put a lot more paperclips into the water than into the water-soap mixture. This is because soaps and detergents reduce the surface tension holding the water molecules together at the surface.
Float a Needle
- Safety Rules:
- Parent supervision
- Take care with the sharp needle
- Materials you need are:
- a container of water
- a sewing needle
- a spoon
- some detergent
Fill the container with water. Put the needle on a spoon, and then slide the spoon gently into the water. Allow the needle to slide off the spoon onto the water surface. It should float. (If it doesn't work first time, keep trying.) Now drop a few drops of detergent into the water. What happens to the needle?
The needle should float on the surface of the fresh water due to surface tension. However, detergent breaks the surface tension of the water so the needle should then sink.
Runny Honey
You will need a smooth chopping board, a support and some honey oil and water.
Tilt the chopping board on a slight angle. Drop equal drops of cold honey, warm honey, water and oil onto the high end of the board. Watch which one flows the fastest.
The cold honey has a lot of cohesion or force holding its molecules together so cold honey will be the slowest. The one with the least cohesive forces will the fastest.
Coloured Celery
You will need a stick of celery (preferably with leaves), some food colouring and a container of water.
Put the celery in the container of water. Add a generous amount of food colouring, and leave it for a day.
The food colouring and water from the container will be drawn up the 'veins' in the stem of the celery by adhesive forces between the water and the walls of the 'veins'. This is also called capillary action.